

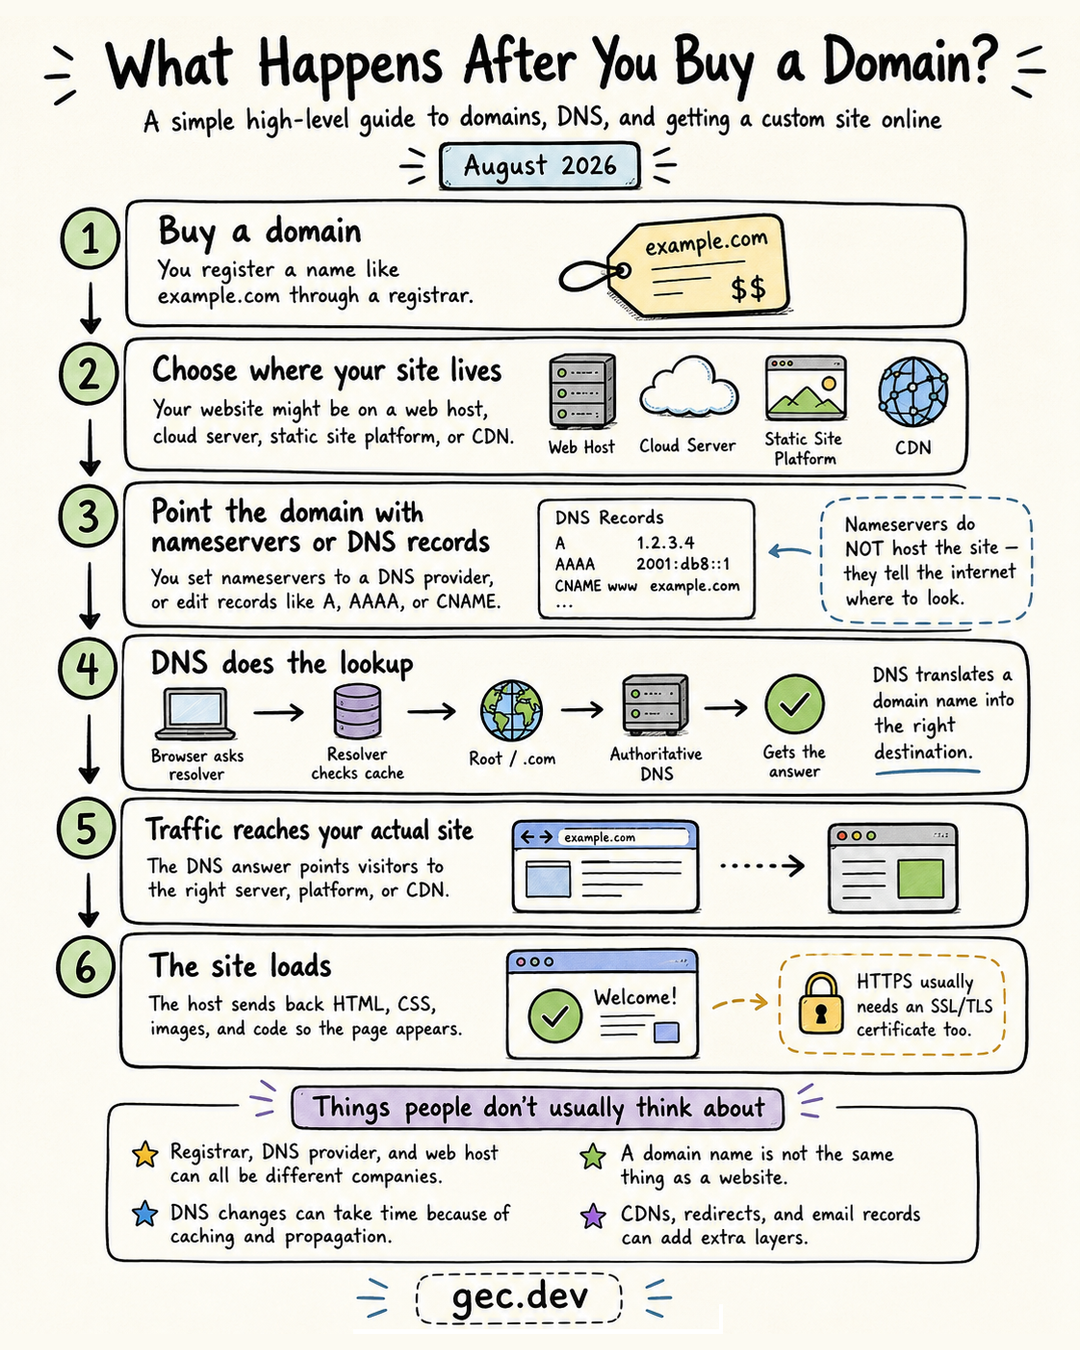
Buying a domain reserves a human-readable name such as example.com. It does not create a website, store its files, or automatically tell browsers where the site lives. Those pieces are connected afterward through a hosting provider and the Domain Name System, or DNS.
The complete path looks like this:
flowchart LR
    Owner[Domain owner] --> Registrar[Domain registrar]
    Owner --> Host[Web host or platform]
    Registrar --> Delegation[Nameserver delegation]
    Delegation --> DNS[Authoritative DNS provider]
    DNS --> Records[A, AAAA, or CNAME records]
    Visitor[Visitor's browser] --> Resolver[Recursive DNS resolver]
    Resolver --> DNS
    Records --> Destination[Server, platform, or CDN]
    Visitor -->|HTTPS request| Destination
    Destination -->|HTML, CSS, images, and code| Visitor
Each part has one job. The registrar records who controls the name, DNS publishes where traffic should go, and the host serves the actual site.
1. Register the domain
A registrar lets you search for an available name and register it for a period of time. Registration gives you control of that name within a top-level domain such as .com, .org, or .dev, as long as you keep the registration active.
The registrar usually provides controls for:
- Renewing the registration.
- Updating contact and ownership details.
- Choosing the domain's authoritative nameservers.
- Locking the domain against unauthorized transfers.
- Managing DNS records when the registrar also provides DNS hosting.
Registration and hosting are separate services. They may come from the same company, but they do not have to.
2. Choose where the site lives
The website needs a destination that can respond to browser requests. That destination might be:
- A traditional web host.
- A virtual server in a cloud platform.
- A static site platform.
- An application platform.
- A content delivery network, or CDN.
The host normally gives you either an IP address or a hostname to use in DNS. A server might provide an IPv4 address such as 192.0.2.10, while a managed platform might ask you to point www.example.com to a hostname it controls.
Uploading or deploying the site to this host makes the content available, but the custom domain still needs to be connected to it.
3. Delegate DNS and add records
At the registrar, nameserver settings delegate authority for the domain to a DNS provider. Nameservers do not host the website. They identify the DNS system that has the official records for the domain.
Inside that DNS provider, resource records map names to destinations:
| Record | Purpose | Example |
|---|---|---|
A |
Maps a name to an IPv4 address | example.com to 192.0.2.10 |
AAAA |
Maps a name to an IPv6 address | example.com to 2001:db8::10 |
CNAME |
Makes one hostname an alias of another | www.example.com to host.example.net |
MX |
Directs email for the domain | Mail provider hostname |
TXT |
Publishes verification or policy text | Ownership, SPF, or DKIM data |
The exact records should come from the hosting platform. Adding both old and new destination records can produce inconsistent results, so remove obsolete records when a migration is complete.
4. DNS resolves the name
When a visitor enters the domain, the browser needs an address before it can contact the site. It asks a recursive resolver, often operated by the visitor's network or a public DNS service.
If the answer is not already cached, the resolver follows the DNS hierarchy:
- A root server points it toward the relevant top-level domain, such as
.com. - The top-level domain nameservers identify the domain's authoritative nameservers.
- The authoritative DNS provider returns the requested record.
- The resolver caches the answer for its time to live, or TTL, and returns it to the browser.
The browser can then connect to the resulting server or platform. Cached answers make later lookups faster and reduce load on the DNS hierarchy.
5. HTTPS establishes a secure connection
DNS gets the browser to the right destination, but HTTPS secures the connection. The server presents a TLS certificate that is valid for the requested hostname. The browser verifies the certificate before sending and receiving protected HTTP traffic.
Many hosting platforms issue and renew certificates automatically after they confirm that the domain points to their service. Until DNS is correct and the certificate is ready, visitors may see a certificate warning or a platform setup page.
The .dev top-level domain is included in browser HSTS preload lists, so browsers require HTTPS for .dev sites from the start. A valid certificate is not optional for a public .dev site.
6. The host returns the site
After DNS resolution and the TLS handshake, the browser sends an HTTP request containing the requested hostname and path. The host uses that hostname to select the correct project, application, or virtual server.
The response usually starts with HTML. The browser parses it and requests the referenced CSS, JavaScript, fonts, images, and other resources. A CDN may serve cached resources close to the visitor while requests for dynamic data continue to an application server.
At this point the domain, DNS, certificate, and host are working together, but they remain independent layers. A domain can keep resolving even when the application is unhealthy, and a healthy server can be unreachable through a domain with incorrect DNS records.
Why DNS changes are not always immediate
DNS records have TTL values that tell resolvers how long an answer may be cached. When a record changes, some resolvers may continue using the previous answer until its TTL expires. Delegation changes can also take time to become visible through caches.
This delay is commonly called DNS propagation, although there is no single update spreading to every server at once. Different caches simply expire and refresh at different times.
For a planned migration:
- Lower the relevant TTL before the change when possible.
- Configure and test the new host first.
- Update the DNS records.
- Keep the old destination available while cached answers expire.
- Restore a suitable TTL after the migration is stable.
A practical setup checklist
- Register the domain and enable automatic renewal.
- Deploy the site to a host or platform.
- Copy the host's required DNS records exactly.
- Set the domain's authoritative nameservers if the DNS provider is separate.
- Add the required
A,AAAA, orCNAMErecords. - Remove conflicting records left by parking pages or an old host.
- Add the custom domain in the hosting platform.
- Wait for the TLS certificate to be issued.
- Test both the apex domain and
wwwif both should work. - Choose one canonical hostname and redirect the other to it.
The important mental model is simple: a domain is a name, DNS is the directory, and hosting is the destination. Buying the name is the first step; connecting those three layers is what puts the site online.
Comments
0 total